Android users may want to mirror their phone screen to computer, so they can easily share contents with a group of people, like those high-definition videos and photos, presentations. Some people like to play mobile games on a larger screen for a better gaming experience. There are several ways to mirror an Android phone to a computer. For example, you can download an app from Google Play and a client software on your computer so as to mirror Android phone screen to PC; you can enable USB debugging on your phone, then connect it to computer using a USB cable, and use a desktop software to mirror the phone screen to computer.
Local screen mirroring vs remote casting
In fact, if you merely need to cast screen from mobile phone to computer in the local network, without the need for remote control, or remote screen sharing over the Internet, you can simply make use of the built-in features, no need any third-party apps. Recent Android phone models and Windows OS support the Miracast technology, a wireless display standard that allows you to cast your Android phone screen to a compatible device, such as a Windows PC.
Step 1. Connect Android and PC to the same Wi-Fi
Connect your Android phone and Windows PC to the same Wi-Fi network. As we mentioned above, we will only discuss screen sharing in local network, in the same room, not remote casting in a different location, which is often used for remote access or remote control purposes.
Step 2. Setup wireless display on PC
Both Windows 10 and Windows 11 support this screen mirroring and projecting to your PC feature. We will use a Windows computer which is running on Windows 11 in this demo.
Click the Start menu from Windows taskbar, then choose Settings > System > Projecting to this PC. If it is the first time you use your PC as a wireless display, you need to install and set up the wireless display first. Click Optional features under Add the “Wireless Display” optional feature to project to this PC. Next to Add an optional feature, select View features, then enter “wireless display” in the search box to find it or scroll down the list to find it. Select the check box next to Wireless Display from the list of results, select Next, then select Install.
Once it is installed, go back to Settings > System > Projecting to this PC.
- Under “Windows PCs and phones can project to this PC when you say it’s OK”, select “Available everywhere” or “Available everywhere on secure networks” depending on your preference.
- If you want to require a PIN for connections, turn on the “Require PIN for pairing” option and choose a PIN.
- Under “Ask to project to this PC”, select “Every time a connection is requested” or “First time only”.
- Click on the link that says Launch the Wireless Display app to project to this PC. Now that your Windows 11 PC is ready to be projected on.
Step 3. Cast screen from Android to PC
On the device you want to cast from, such as an Android phone or tablet, open the Settings app and go to Connected devices > Connection preferences > Cast, or Connected devices > Cast or Screen Mirroring. Depending on the phone or mode you have, the screen casting settings may differ.
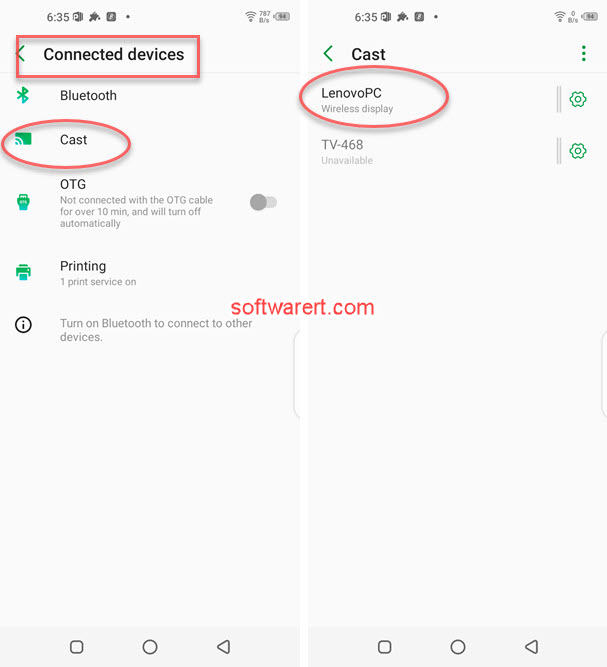
Click on the three-dot menu button in the top-right corner and check Enable wireless display.
You should now see your Windows PC listed as one of the available cast options. Tap on it to start mirroring Android mobile to Windows computer. If you see a notification asking for permission to cast Android to Windows PC, make sure to choose Always allow > OK on the computer.