You can add text, logo or an image file as watermark to your videos or GIF animations to protect them. We have discussed how you can add text as watermark to GIF using Photoshop. Today, we will show you how to add an image, such as your logo, as watermark to a GIF file using Photoshop on a Windows computer.
Step 1. Import GIF to Photoshop
Launch Photoshop on your PC. Click File > Open to find the source Gif file on your computer and import it to the graphic editor.
Repeat the steps to add your logo, photo or any other image to Photoshop.
Alternatively you can drag the image and GIF files from Windows File Explorer to the editor program to quickly load them.
Step 2. Select the last image layer in GIF
Whenever we open the GIF animation in Photoshop, all frames will be open as image layers. You can find all image layers in the Layers panel on the right hand side. The first image or frame layer will be selected by default. Since a new layer will be inserted above the currently selected image player, we have to select the last frame layer in the list so we can directly insert the image or logo at the top of the layer list without the need to rearrange the order of the layer manually.
Step 3. Add the image/logo as a new layer to GIF
Whenever we open the logo or image in Photoshop, the editor automatically places it on the Background layer in the Layers panel at the lower section of the right sidebar.

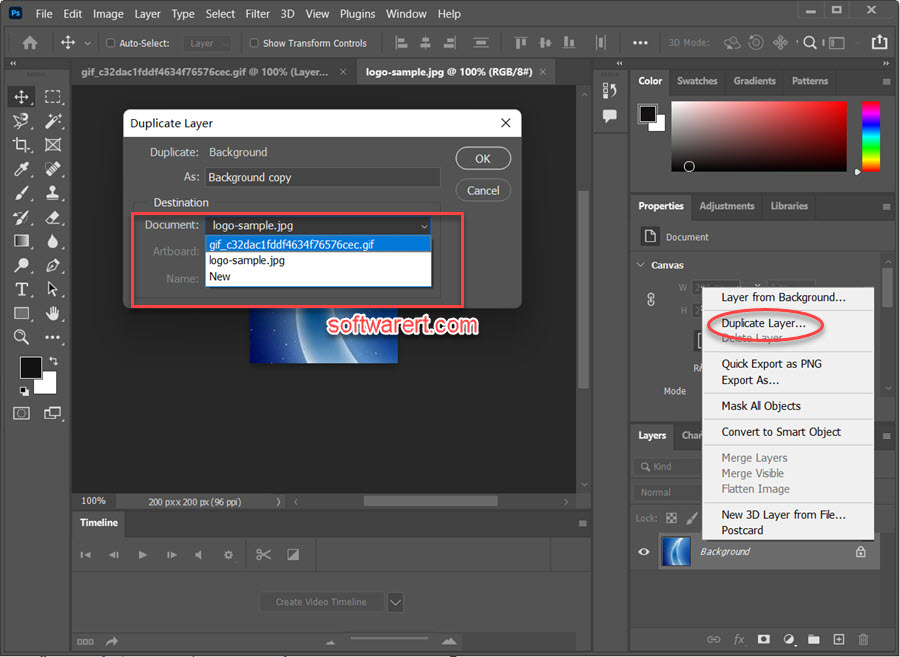
Now we have to copy this image or logo as a new layer to the GIF file in Photoshop. Right click on the background layer, choose Duplicate Layer from the contextual menu. The Duplicate Layer dialog pops up. In the Duplicate Layer window, click the drop-down menu next to Document and select the name of the destination document, the GIF file in this case, and click OK. The duplicated layer, your image or logo, is now available in the layers panel for the GIF file. Since we have selected the last frame layer in the GIF file in step 2, you can now find the image or logo layer at the top of the layer list.
Step 4. Resize logo or image
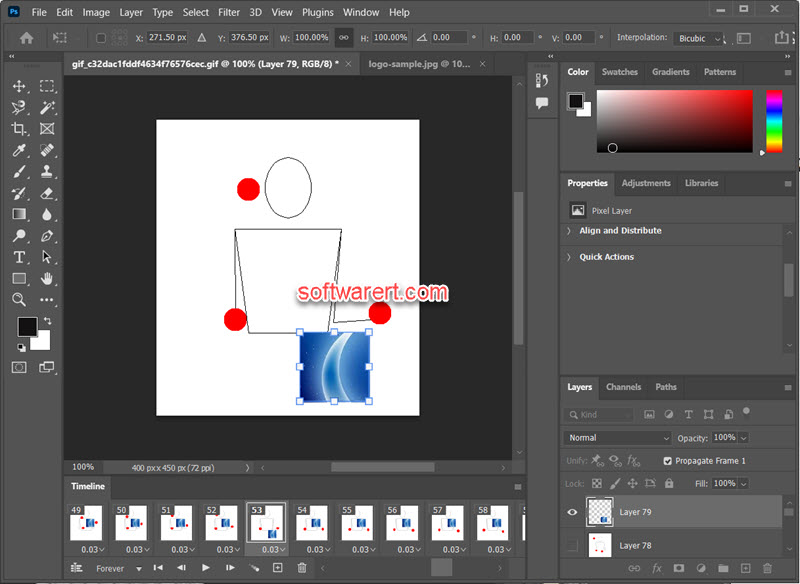
Press Ctrl + T key combination to select the image or logo, drag and drop its borders to resize it, you can also rotate it, drag-n-drop to place it anywhere on the canvas. You may also want to adjust the Opacity which can be found above the layers list in the Layers panel.

Step 5. Preview GIF
Go to Window > Timeline to open the Timeline panel at the bottom. Click the Play button from the bottom of the Timeline panel (or press the Spacebar on your keyboard) to preview the animation.
Step 6. Export GIF
Go to File > Save a Copy > GIF > Save to export it as a new GIF file on your PC. Or you can go File > Export > Export As to export the GIF file with your saved preferences to your computer.
