Charles Proxy is an HTTP proxy and monitor program that helps us view all of the HTTP and SSL / HTTPS traffic between our computer or mobile phone and the Internet. Other than monitoring network traffic between local machine and the internet, we can also configure Charles for Windows or Mac to capture and inspect network requests and responses on our iOS device. Today, we will use Charles Proxy for Mac and iPhone in the demo to show you how to use Charles to capture network requests and responses, record network requests and responses on iPhone iPad.
Download and install the proxy program on to your PC or Mac first from previous linked page above (30-day free trial, $30 to buy).
Connect your iPhone or iPad to the same Wi-Fi network with your PC or Mac. Otherwise you can’t connect to Charles proxy on your desktop or laptop from your iOS device.
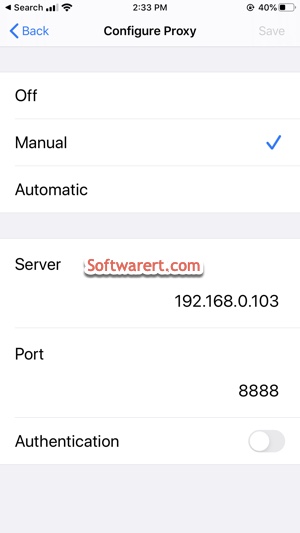
Configure Proxy on iPhone iPad
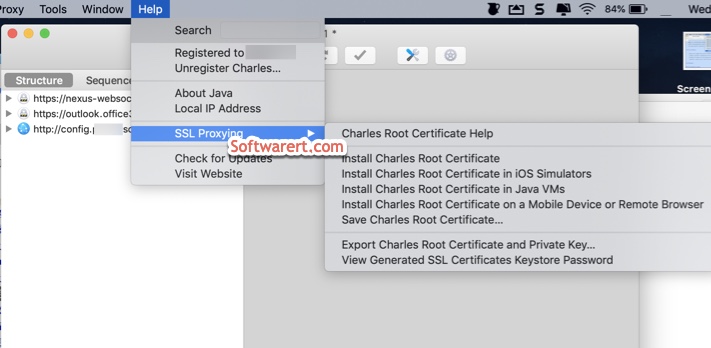
Run Charles Proxy on your computer, go to Help menu > SSL Proxying > Install Charles Root Certificate on a Mobile Device or Remote Browser. See also this tutorial to install Charles Proxy Root Certificate on Mac.
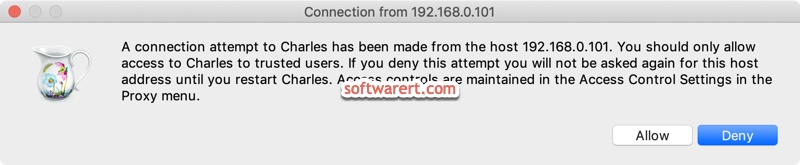
You will get a pop-up dialog like this.
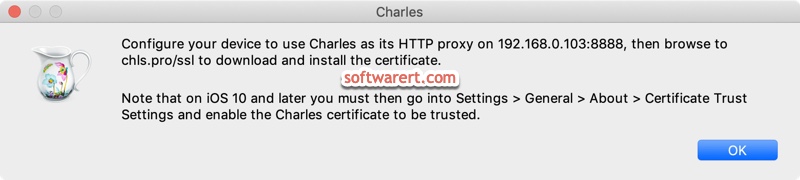
Now we need to set the iOS device to use Charles as its HTTP proxy from Settings. Open Settings on iPhone/iPad, tap Wi-Fi then tap on the Info icon next to the network you’re connected to. Scroll all the way down, and under HTTP Proxy, tap on Configure Proxy. Switch from Off to the Manual on the Configure Proxy screen. Enter your Mac or PC IP address in the Server field, enter 8888 in the Port field, then Save.
You should see a connection request in Charles on your computer saying your iOS device(host address) is trying to connect Charles Proxy. Click Allow. You should now be able to capture all HTTP traffic from your iPhone/iPad in Charles.
Important Tips:
- If you didn’t see the connection attempt in Charles on your PC or Mac, or your iPhone iPad can’t connect to the Charles Proxy or the internet, try close and relaunch Charles on your computer. This simple trick may fix various connection issues between your mobile and computer via Charles proxy.
- If you can’t visit a website on iPhone, most likely the website is protected with SSL. Continue reading below and follow the instructions to install Charles certificate on your iOS device to fix this problem.
Install Charles Proxy Certificate on iPhone iPad to view SSL / HTTPS traffic
Once you approved the connection from iPhone or iPad in Charles for desktop, you should be able to view all of the HTTP traffic. Websites with SSL certificate installed however can’t be captured. If you want to monitor and inspect the SSL / HTTPS traffic between iPhone or iPad and the Internet, you must install Charles Proxy Certificate on the iPhone iPad.
Go to download and install the Charles Proxy Certificate from http://www.charlesproxy.com/getssl or chls.pro/ssl using Safari or any other web browser on your iPhone or iPad. You will see a warning as below.
This website is trying to download a configuration profile. Do you want to allow this?

Tap Allow to download Charles Root Certificate on iPhone. Then go to Settings > General > Profiles to find the downloaded profile and tap the Install button then follow on-screen tips to install the Profile on your iPhone or iPad.

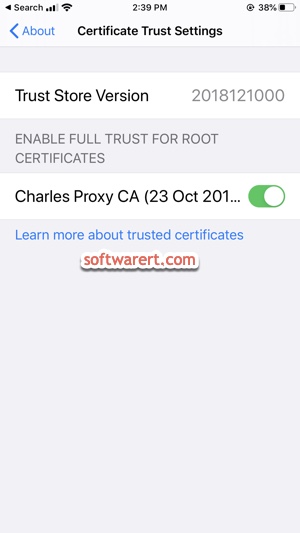
On iOS 10 or later you must also go into Settings > General > About > Certificate Trust Settings to enable and trust the Charles certificate. When you see the Root Certificate warning, make sure to tap Continue to confirm it.