Got an animated GIF file which is too big to be shared? There are many different tools and techniques to reduce file size of GIF files. For example, you can try to decrease its quality, reduce the duration, reduce the size or dimensions of frames, reduce frame rate, etc. In this post, we will share 5 quick methods of compressing a GIF file to smaller file size.
Method 1. Trim GIF in Photoshop
If you have a very long GIF with some parts in it you want to remove, you can use Photoshop to cut off those unwanted sections.
Open Photoshop on your PC. Click File > Open to locate the GIF file saved on your hard drive and import it to Photoshop.
Click Window from the top menu bar, choose Timeline from the long menu list to show the Timeline at the bottom of your workspace.

Click the Play button at the bottom of the Timeline to preview the GIF to estimate where you want the GIF to start and end. For instance, if we need to delete all frames after the 30th frame, click to select frame 31, then press Shift key and click the last frame to select all frames between them. After that, click the Delete button at the bottom of the Timeline to delete all selected frames. A confirmation window will pop up, choose Yes to confirm and remove the unwanted frames. In this way, you can reduce the duration of the animation with fewer image frames, which in turn make the GIF file size smaller.
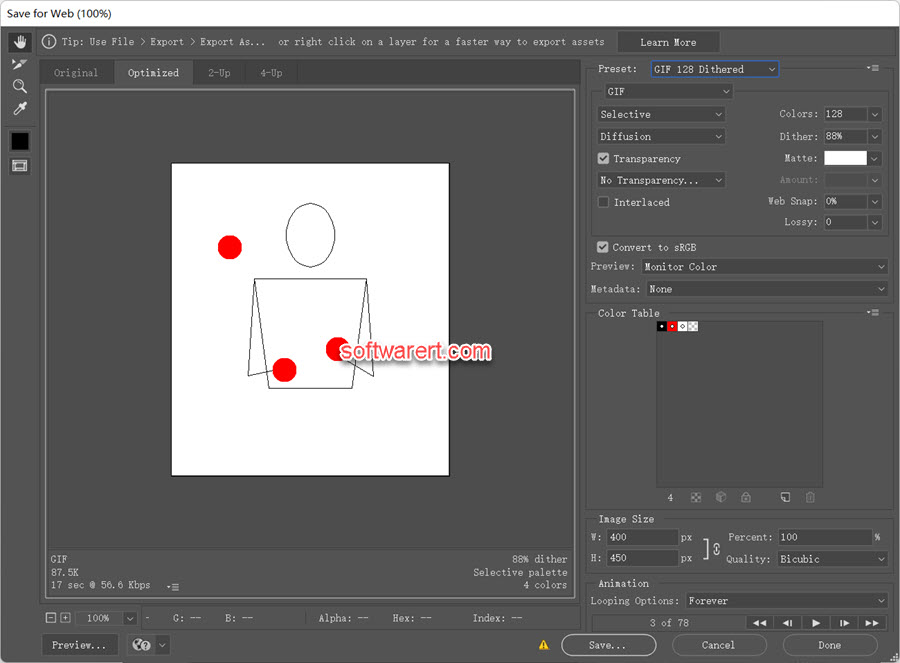
Go to File > Export > Save for Web (Legacy)…, select GIF as the output format, optionally tweak other parameters and export the new GIF file to your computer.
Check the size of the compressed GIF file in Windows File Explorer and play it in a photo app or web browser to see the quality of the image.
Method 2. Reduce image or frame size
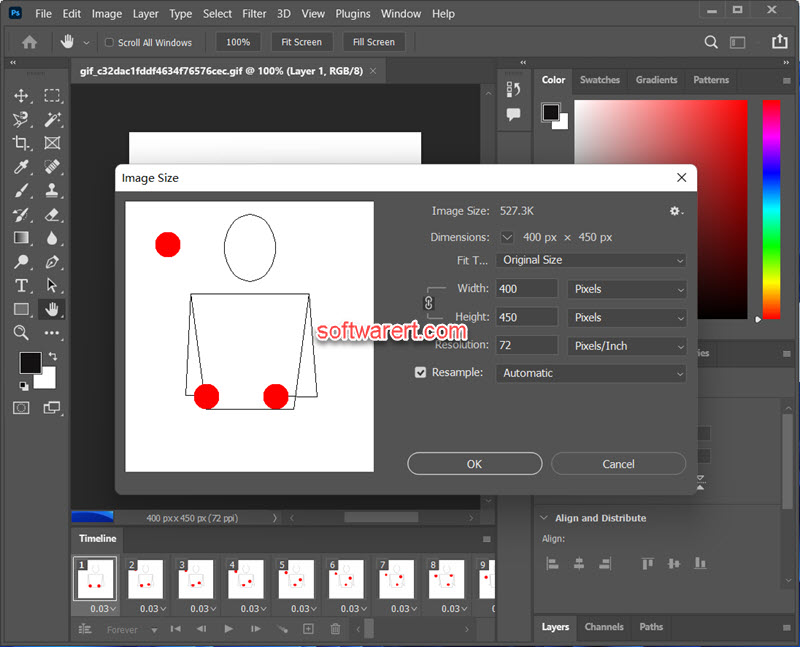
Reducing the frame size, width/height pixel dimensions, is a quick way to compress large GIF animations. For example, if the source GIF file is 800*900p, you can reduce the width/height to a smaller size, say 400*450p. Here’s how to change image size of GIF frames in Photoshop.
Open the GIF file in Photoshop, click Image from the top menu bar, select Image Size from the drop-down menu to open it in a new dialog where you can decrease the dimensions of all GIF frames. You can manually input a smaller value in the Width box, then the height changes accordingly. Other than scaling image frames by pixels or inches, you can also adjust them by percent. Other than decrease the width/height values, you can also type in a smaller resolution, so both width and height will change automatically. Press OK button to save the change.
Again if Timeline is not enabled yet, click Window from the top menu bar, choose Timeline from the long menu list to show the Timeline at the bottom of your workspace. So you can preview the animation in Photoshop before exporting it to your computer.
Go to File > Export > Save for Web (Legacy)…, to export the new GIF file to your computer.
Check the size and quality of the new GIF file.
Method 3. Delete image frames from GIF
Obviously, dropping frames will reduce gif size. Similar to Method 1 above, you can reduce the number of frames in a GIF file so as to reduce down the file size. Removing similar or duplicate frames will help to make GIF file size smaller. This is useful for GIFs created out of high-FPS videos. For example, you can delete a frame every 5 frames, so the total count of frames will be 80 if the source GIF has 100 frames in it.
In Photoshop you can easily delete the animation frames from the Timeline panel. Preview and select the frame to delete, then click Delete at the bottom of the Timeline panel. Play the GIF file in the Timeline. If need, you can manually increase the duration of image frames also in the Timeline.
Method 4. Reduce the number of colors
The maximum color amount is 256. You can make a GIF file smaller by reducing the amount of colors. The fewer colors you use, the smaller the file size. This however compromise image quality. Thus you have to find the balance between the fewest number of colors and the best-looking image.
In Photoshop, go to File > Export > Save for Web (Legacy)…, you can choose an optimized GIF preset such as GIF 128 Dithered, GIF 128 No Dither, GIF 64 Dithered, GIF 64 No Dither, GIF 32 Dithered, GIF 32 No Dither, GIF Restrictive.
Method 5. Reduce the amount of dithering
Dithering adds different-colored pixels in close proximity to each other to simulate secondary colors or smooth gradations in color. The fewer dithering in an image, the smaller the file size.
In Photoshop, go to File > Export > Save for Web (Legacy)…, you can choose a preset without dithering or manually decrease the amount of dither.
Gif compression extra tips
You can shrink GIF for smaller file size and faster speed with the above solutions. Moreover, you can reduce the GIF file size with more other options in Save for Web window, such as perceptual, selective, adaptive, restrictive, transparency, interlaced and so on.
Last but not least, you can start small, because these small tweaks, changes are enough to make big difference of your file size and greatly bring the GIF file size down.