Want to share a video without sound or mute part of audio track because of the crappy audio that’s captured? Today, we will share with Windows users several ways to mute video or delete sound from part of a video on Windows PC so you don’t have to worry about the embarrassing audio in the video. Just remove the audio from the video or mute the whole video, optionally add some music or voice-over in the background if like.
Contents
- Method 1. Mute video with Clipchamp
- Method 2. Remove audio from video in VLC
- Method 3. Mute part of a video in VLC
- Method 4. Delete sound from video in Camtasia
- Method 5. Mute video parts in Camtasia
Method 1. Remove audio or mute video with Clipchamp
Chipchamp is the new built-in video editor since Windows 11. Get it in the Microsoft Store for free if it can’t be found on your PC. You can use it to edit videos for free.
Open the Clipchamp video editor on your PC. Click on the “Create a new video” button from its home screen. You will then be taken to the Your media screen where you can select and import the video you want to extract the audio from. Click Import media button or simply drag and drop media from your device to import. The imported videos will be displayed as thumbnails in its media library or media bin on the left column. We have to drag and drop it to the Clipchamp timeline below the preview window along the bottom.

Click the speaker icon above the video clip in the Timeline to mute it. Alternatively right click on the video in the Timeline, the contextual menu appears, choose Audio > Mute.
Method 2. Remove audio from video in VLC
VLC (also known as VLC player, VLC Media Player) is a free and open-source, cross-platform media player and suitable for simple edits. It is available for Windows, Linux, Mac. In this article, we’ll show you how to remove audio from video using VLC for Windows on a PC.
We are using VLC media player version 3.0.17.4, the latest as of Dec 2022, on a Windows 11 computer in this demo. You may see some difference if you are using another version of the player.
Run VLC on your computer. Click Media from the top menu bar, choose Convert / Save from the drop-down menu.
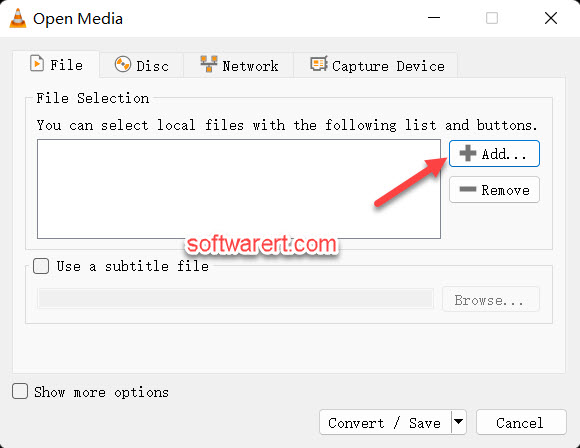
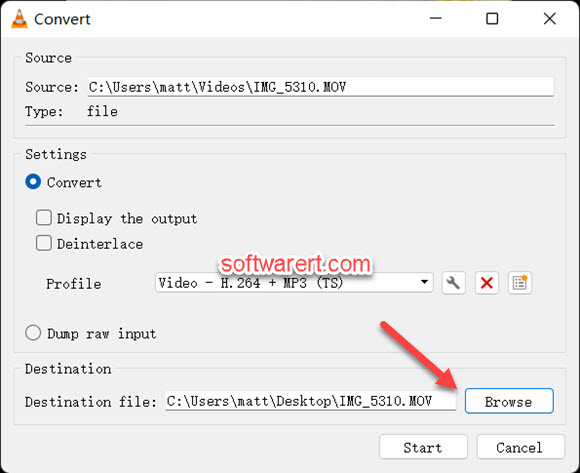
You will then see the Open Media window. Click the Add… button to find the video you like to mute. Then click on the Convert / Save button in the bottom right corner.
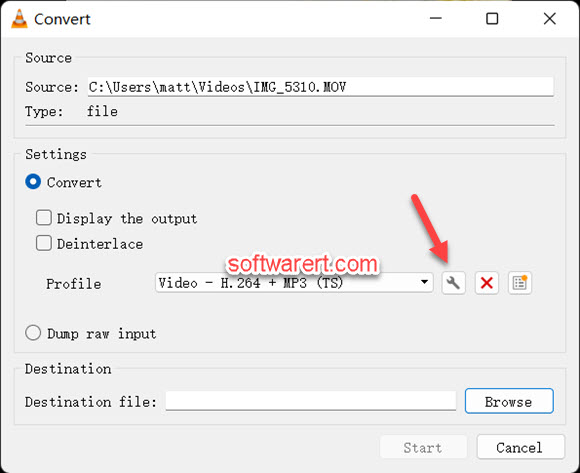
The Convert window opens. In the Settings section, a video profile will be selected automatically. Click Configure (the wrench icon) after the video profile to edit it.
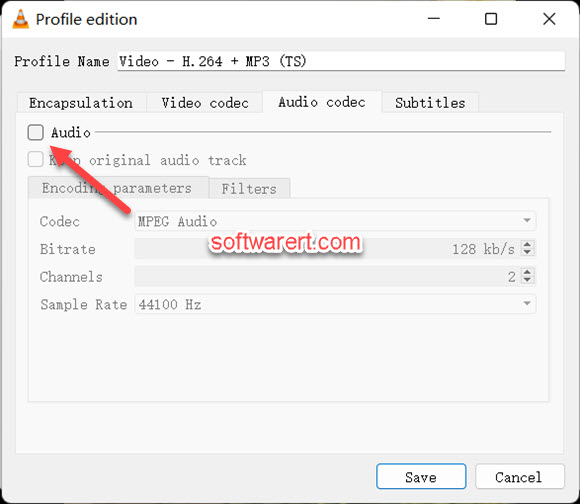
In the Profile Edition window, switch to the Audio codec tab and click to untick the Audio checkbox. In this way, we will dump the audio streams from the video file during the conversion process.
Click on the Save button in the bottom right corner. We will return to the Convert window. Click Browse to choose a location to save the muted video.
Click on the Start button and we’ll now return to the main interface of the VLC media player. Finally click the Play button to start the conversion process.
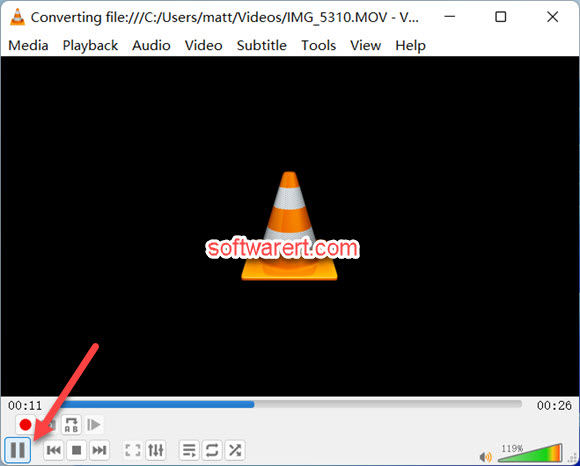
Once the conversion is done, you will find the video saved to the destination folder you have specified. Just play the converted video to make sure the audio track has been removed. You can also check the codec information in VLC to ensure there is no audio stream in the video.
Method 3. How to mute part of a video using VLC player?
VLC doesn’t provide us an intuitive way to remove audio stream from part of a video. We have to trim the video in VLC first, then follow above steps to delete audio from the trimmed video, finally join the two or more video clips together using VLC.
A more effective way is to use a more powerful video editor. Here we will show you how to mute part of audio track. Instead of removing audio from the whole video, you can choose to mute only part of the video.
Method 4. Delete sound from a video in Camtasia
Unlike VLC, Camtasia is a commercial video editor from TechSmith. You have to pay for a license. You can use it to delete sound from a video or from part of the video on Windows or Mac computer.

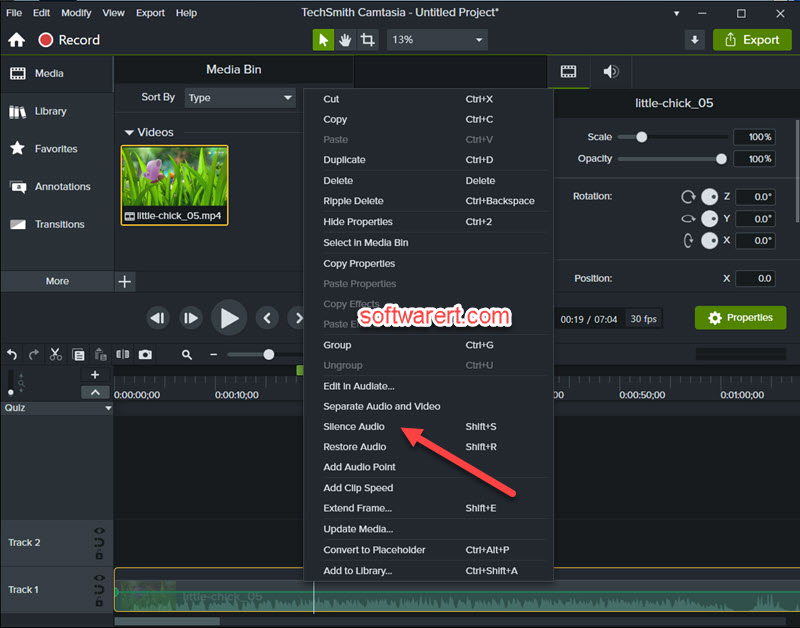
Open Camtasia on your computer, go to create a new project. Import the video to the Media Bin, drag it to the timeline at the bottom.
Right click on the video track in the timeline, then choose Silence Audio from the contextual menu. Finally go to export it to your computer as a new video without any audio.
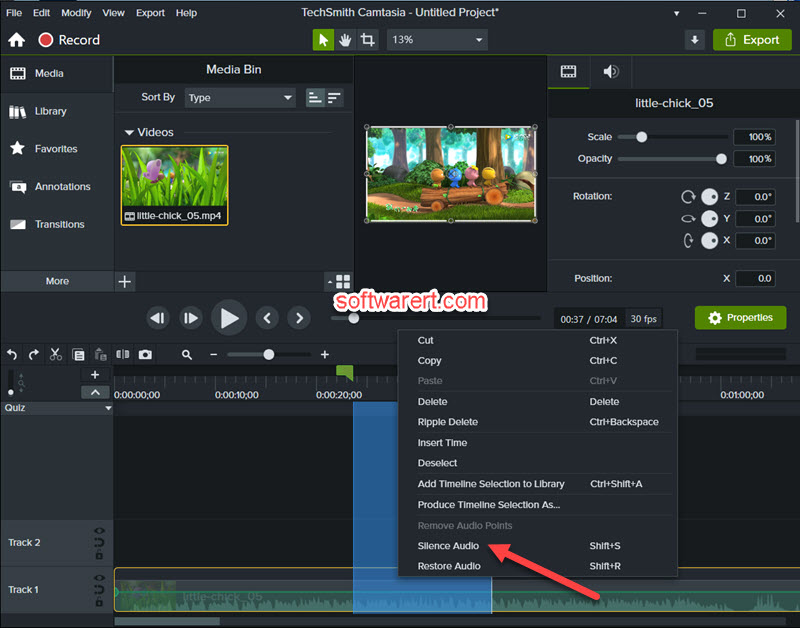
Method 5. Mute part of a video in Camtasia
To delete sound from part of a video in Camtasia is very straightforward.
In the timeline, you can see the playhead with the red and green color sliders on either side. Drag the green slider to select the starting point, and drag the red slider to select the ending point of the portion of the video which you like to remove the audio stream from. Right click the selected part of the video in the timeline, select Silence Audio from the contextual menu. Finally go to export the video with part of it being muted to your computer as a new file.