The iPhone 8, iPhone 8 Plus, iPhone X will save your camera photos as HEIC files automatically. For greater compatibility, Apple allows iOS users to change the default photo format back to the legacy JPEG option. And currently you can’t alter iPhone photo format without using a third party image editor. However Apple allow us to natively convert HEIC to JPG automatically upon transferring HEIC images to a Mac or Windows PC. To do this, you just need to configure the iPhone settings. No extra apps required.
On your iPhone 8, iPhone 8 Plus or iPhone X, open Settings app. Scroll down until you see the Photos entry, tap on it. In the Photos settings screen, scroll down to the bottom, you will find the Transfer to Mac or PC section. Here you can see two options: Automatic and Keep Originals.
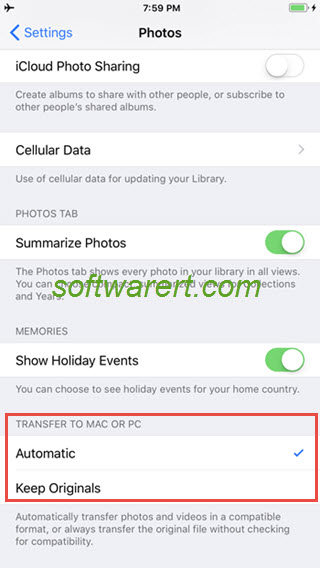
Transfer iPhone photos to computer as JPG
Select Automatic to select JPG format when transferring to Mac or PC computer. After that go to connect your iPhone 8, iPhone 8 Plus, iPhone X or later to your computer via USB, you can then find the photos in your Camera Roll are all in JPG file format. Copy and paste the iPhone photos to computer via USB. In this way, you can export HEIC images as JPG format onto Windows PC.
Transfer iPhone photos to computer as HEIC
By default your iPhone will shoot HEIC pictures. If you do not want to convert them into JPG format, set your iPhone or iPad to Keep Originals, the HEIC picture will remain to be in the same image format.