Want to add your name, logo, site name, or brand name to your video? You can superimpose these information onto your video footage using various software tools. Camtasia is a very popular screen recorder and video editor software for Windows and Mac users. You can use it to record screen on your computer, make video demo or tutorials, edit footage, create your videos. If you want to stamp a watermark on the video before publishing or sharing them on the web, it can also help.
There are various methods you can watermark videos using Camtasia Studio. You can use simple text for watermarks, or create an image file, preferably in PNG format with transparent background, as watermarks. If you have an existing logo image file, you can directly use it as watermark in Camtasia Studio.

Method 1. Add image watermark to video with Camtasia Studio
Camtasia offers several options for watermarking your videos. Run Camtasia Studio on your computer, open an existing project or go to create a new project from scratch. Import the video to which you like to add the watermark. Drag it from the Media Library to the timeline in Camtasia Studio. You will be prompted to select the size for the video. Optionally you can edit the video if need.
Part 1. Add Watermark Image with Camtasia recent versions
Click the File menu and select Import > Media from the drop-down menu. Alternatively you can import media files from the Media Bin or Library. You’ll typically see a Media Bin or Library panel on the left side of the interface. In the Media Bin panel, you can click on the Import Media button or right-click within the panel and select Import Media. Navigate to the folder where your media files are located and select the files you want to import. In the Library panel, click on the Import Media button to browse to your local albums and import your watermark image.

Drag your watermark image to the timeline by clicking and dragging it onto the timeline tracks. Put the watermark image onto a track above your video clip on the timeline.
Click on the watermark image in the timeline to select it. In the preview window, you can adjust the size and position of the watermark by clicking and dragging the corners or edges of the watermark image. In the properties panel on the right hand side, you can adjust the opacity of the watermark image.
Set the Duration of watermark image
There are a couple of methods to adjust the duration of the image. For example, You can adjust the image’s duration by clicking and dragging the left or right edge of the image on the timeline.
Preview the video and once you are satisfied with the watermark, click the Export button from the top right corner and follow on-screen tips to select file format, folder location to save the video to your computer or publish it online.
Part 2. Add image watermark with Camtasia old versions
On some older versions of Camtasia Studio, you can impose the watermark image during the production or export process.
Once you finished editing the video, click the “Produce and share” button, or click File menu, then choose “Produce and share” from the drop-down menu list. The Production Wizard opens. Here you need to choose “Custom production settings” option from the drop-down menu in the Production Wizard, otherwise you will not get the option to add watermark. Click Next button, then choose an output video format and click Next button for two or three times until you are at the Video Options screen.
Here you have the Watermark option, click to enable “Include watermark” in the Watermark section. Click Options… button to open the watermark options in Camtasia Studio. You can browse to the image path of your watermark, apply various effects to the watermark image, scale watermark, change watermark positions, preview watermark and so on. See below figure.
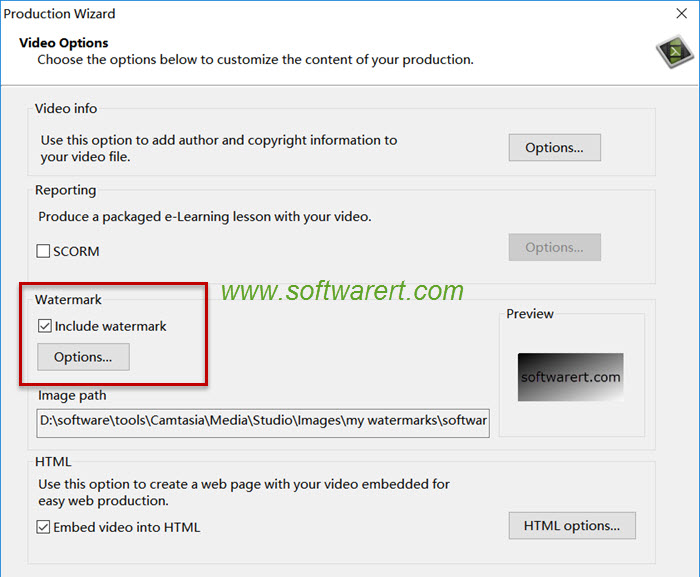
Follow the on-screen tips to finish the video production, save your video and it will have a watermark placed on it, could it be your logo, domain name, author name, brand name or else.
Method 2. Add text watermark to video with Camtasia Studio
Sometimes however you may prefer to add simple text as watermarks. For example, you can stamp your name, brand name, site address on the videos without an logo or PNG image file. How to add text as watermark to videos in Camtasia Studio?
Launch Camtasia Studio on your computer. Open an existing project or create a new one. Go to the Annotations tab, which is located in the left panel of the Camtasia interface.
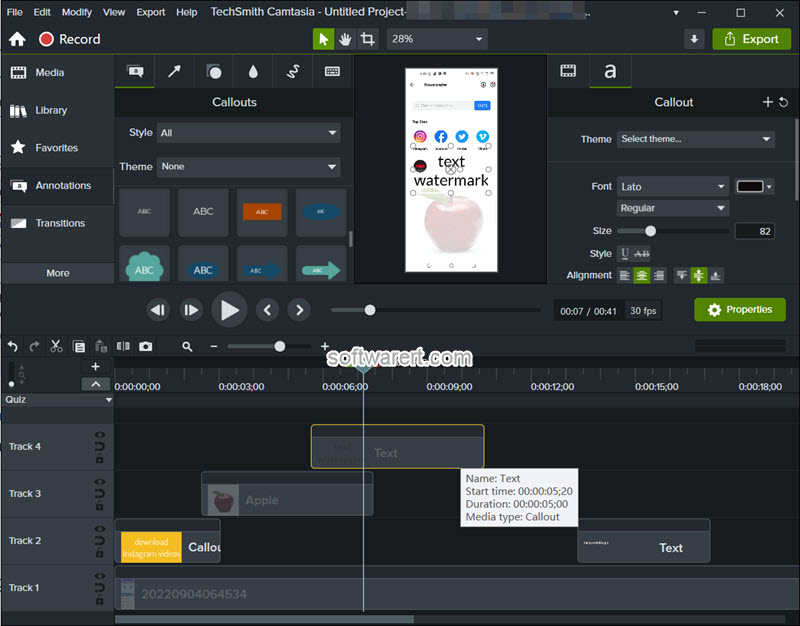
You can select various text annotations to add to your video. Drag and drop the chosen text annotation onto a track in the timeline at the point where you want to add text to your video. Camtasia Studio provides many options to customize text on videos. For example, you can change text font, size, color, style, align, fade in/out, etc. To change the position of text watermark on video, simply drag and drop it in the built-in video player window. You can drag and drop the text in the timeline to set its start time. To extend the display time of your text watermark, simply mouse on the end of the text in timeline, then drag it.
Preview the video and once you are satisfied with the text watermark, click the Export button and follow on-screen tips to select file format, folder location to save the video to your computer or publish it online.
Want to protect your copyright or prevent people from using your video without your permission? Get them watermarked now.