Windows Movie Maker is a built-in app in Windows OS with basic video and audio editing features. You can use it to rotate iPhone videos that are upside down or sideways, trim long videos to short clips, apply visual effects to enhance your footage, add animations to make photo shows, split long videos to short clips, etc. Today, we will show you the quick steps to adjust video volume, increase or decrease video sound in Windows Movie Maker on computer.
Steps to adjust video volume in Windows movie maker
Run Windows Movie Maker on your computer. If you are on Windows 10, search ‘Movie Maker’ in the search box at the bottom-left corner in the taskbar to quickly launch Windows Movie Maker. Its Home tab opens by default. Click Add videos and photos button, navigate to the folder where the video you want to adjust resides and add it to the Movie Maker.
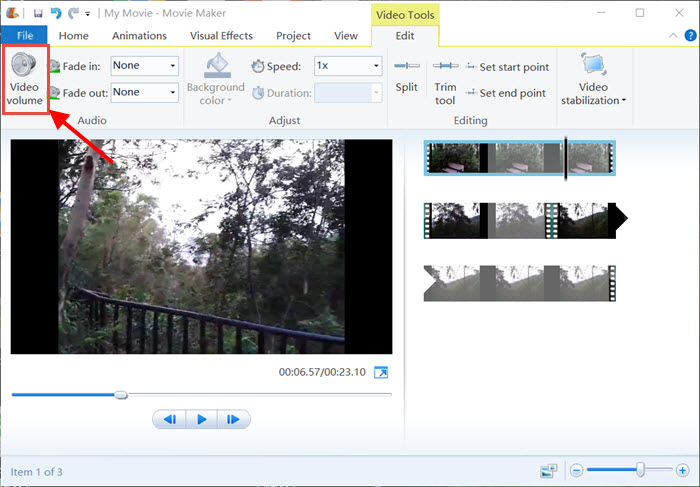
Switch to the Video Tools > Edit tab in Windows Movie Maker. Click Video volume on the left side of the top toolbar. Drag the volume bar left or right to decrease or increase sound of the movie file in Windows Movie Maker. You can even drag the volume slider to the left end to mute a video in Windows Movie Maker.
Finally go to the File menu, select Save movie, follow on-screen tips to choose a video format or target device and export the video from Windows Movie Maker to your computer with optimized settings.
Change volume for part of a video in Windows movie maker
When you need to change volume for part of a video other than the full sound track for the entire video, you can use Windows Movie Maker to split the video into different clips and apply different volume for them. In Windows Movie Maker > Video Tools > Edit, you can find the Split tool. Fine-tune the range section and volume adjustment in conjunction with the built-in player.